Creating a Micro-frontend application with a Single SPAframework
We will be discussinghow to set up a micro frontend application using a framework called Single SPAin this article.
Here the objective is todevelop an application with the following three parts, Angular header, Vue page and React page.

To start with SingleSPAframework you need to have Angular, Vue, and/or React developmentenvironments depending on the components you are using.
Let's start with runningthe following commands to create a folder called single-spa-demo and micro-rootfolder inside it. Then we will execute an npx command to start with singleSPA.
mkdir single-spa-demo
cd single-spa-demo
mkdir micro-root
cd micro-root
npx create-single-spa
Now a directory for thenew project will be asked for. I will choose the default directory by pressingenter. Here we are going to generate the application container or root configproject inside the micro-root folder. So I will choose single-spa rootconfig by using arrow keys. Then I have to choose a packagemanager. I will choose npm and use typescriptas well by typing ‘y’. Later I’ll choose the single-spa LayoutEngine by typing ‘y’. Then I have to give a name for the application. Iwill type single-spa-demo and continue.

After that, the relevantpackages will be installed and we will be getting the following messageindicating project initiation was successful.

Now I will type npminstall and later start the application by npm start command.
After starting thesingle spa root application, we can go to http://localhost:9000/ in the browser and the following screen will show up. Thatmeans root application is running properly.

Now we can create singlespa micro applications and link them to root.
First, we will create aheader component using the Angular framework. I will go to single-spa-demofolder and start the terminal from there. For Angular applications, there is noneed to create a folder manually as the Angular command is creating a folder withthe project name.
I will run single SPA byrunning;
npxcreate-single-spa.
At this juncture projectdirectory will be the default and the type will be single-spa application/ parcel. The framework can be selected as Angular and Iwill give micro-header as the project name. I will enforcestricter type checking by typing ‘y’. Since it is a simple application I willnot use routing. So I will type ’n’.
Next, we can choose astylesheet format. I will choose CSS. Then the application willbe created with relevant packages. After that, it will ask whether to useanonymous data to improve. You can choose yes or no. Then it will ask whetheryou want to use Angular routing. I am saying "no". I am not using thebrowser animation either.


After some time thefollowing message will be displayed, indicating the project setup has beencompleted.

Now you can see a newfolder named "micro-header" created inside the single-spa-demofolder. I will go there and run npm install. Now I have to run the followingcommand to start the angular application. (not ng serve or npm start)
npm runserve:single-spa:micro-header
(If your4200 port is already being used for any other application you can editpackage.json to use another port. Then you have to use the correct port for thebelow URL).
Now you can go to theabove-mentioned URL using a browser to see the Angular application. For my caseit is
http://single-spa-playground.org/playground/instant-test?name=micro-
header&url=%2F%2Flocalhost%3A4200%2Fmain.js&framework=angular
Now we will beredirected to our Angular application.

The next step is toregister the header application in root-config. For that we need to access micro-root folder and add shared dependencies inside index.ejs file. Since weare using the angular framework we have to uncomment the following script line as the first step to load one instance of zoneJs file.
<!--
If you need to support Angular applications, uncomment the script tag
below to ensure only one instance of ZoneJS is loaded
Learn more about why at https://single-spa.js.org/docs/ecosystem-
angular/#zonejs
-->
<!-- <script src="https://cdn.jsdelivr.net/npm/zone.js@0.11.3/dist/zone.min.js">
</script> -->

micro-root/index.ejs
Then we can go to the Angular header application that we opened from the browser earlier, and clickthe Single-SPA icon in the bottom right corner.

Here you can go to Root Configuration from the left menu and find the import script.

http://single-spa-playground.org/playground/root-config-guide
Since we are in a development environment we can copy the link to the main.js file and add it tothe imports in index.ejs file.
"micro-header":"//localhost:4200/main.js"

micro-root/index.ejs
Now we can go to micro frontend-layout.htmlfile and update the default route application to micro-header.
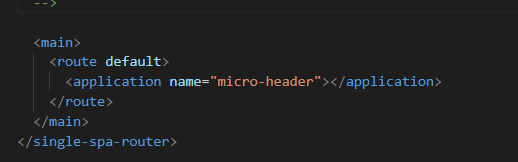
mirco-root/microfrontend-layout.html
At this moment if you goto http://localhost:9000/ you will see the Angular application is loaded successfully inside the SingleSPA container.
Now I will delete everything in app.component.html in the Angular application and paste the following code just to make a simple header row.
<divstyle="width: 100%; text-align: center; padding: 20px 0;
background-color: #D6002F; color: #ffffff;">Header</div>

single-spa-demo/micro-header/src/app/app.component.html
Then refreshing the browser you will see the Angular header is loaded successfully.

Now we have to create two more applications, page-one and page-two. I will go to single-spa-demo folder and open the terminal from there. Here we will create page one as a Vue application.Since Vue does not create a folder, we have to create a folder manually.Therefore I will create a folder using mkdir and run the npx command again.
mkdir micro-page-one
cd micro-page-one
npx create-single-spa
I will use the default directory, ‘single-spa application / parcel’ and Vue. Then Organisation name can be given as ‘micro-page-one’. then I will choose merge from the target directory exists message and later choose default preset.

After a moment we willbe getting the following message:

Now I will do npm install and run the application using given command.
npm install
npm run serve
If you go to thesingleSPA playground URL mentioned just after creating the Vue app, you can seeVue app runs successfully.
(Default port for Vueapp is port 8080. If this port is used for another application in your development environment it will run on a different port and that port will be shown just after running the serve command. You have to use the correct port inthe playground URL. Here my Vue app is running on port 8081 so I will updatethe port in URL to 8081)

http://single-spa-playground.org/playground/instant-test?name=@micro-
page-one/micro-page-one&url=%2F%2Flocalhost%3A8081%2Fjs%2Fapp.js&framework=vue
Now we have to register the Vue app as well. We can go to root configuration from Single SPA playground and find the import script in the same way we found it in the Angular application. Then that import statement needs to be added to index.ejs inmicro-root folder.

http://single-spa-playground.org/playground/root-config-guide

micro-root/index.ejs
The next step is to place the application in the layout. For that, I will go to micro frontend-layout.html and place the application just below the micro headerin the default route as I need to show page-one in the default route.

micro-root/microfrontend-layout.html
Now we can see the Angular header and Vue body in http://localhost:9000/. I will delete everything and paste the following codein App.vue file in the micro-page-one just to make page one clearer;
<template>
<div style="width: 100%; text-align: center;padding: 100px 0; background-color: #3FB27F; color: #ffffff;"> PAGEONE</div>
</template>

single-spa-demo/micro-page-one
At this moment you will be able to see the Angular header and Vue page one in the default route.

The next part is to create the react application. React does not create a separate folder,there fore we need to create a folder manually. I will start the terminal from single-spa-demo folder and follow the same path and select react application.
mkdir micro-page-two
cd micro-page-two
npx create-single-spa

Later the following message will be displayed.

Now I will run npminstall and the run
npm start --port 8500
After that, I can go to the above-mentioned URL and see the react application. In my case it is,
http://single-spa-playground.org/playground/instant-test?name=@micro-
page-two/micro-page-two&url=8500
I will do a small modification in the root.component.tsx file to make it more clear. I just add the following line to the return statement.
return<section><div style={{ width: "100%", backgroundColor:
"#18A1C6", padding: "100px 0",color: "#ffffff", textAlign:"center"
}} > Page Two</div></section>;

ingle-spa-demo\micro-page-two\root.component.tsx
Before registering the react application we need to add the following lines to the import statement inthe index.ejs file
"react":
"https://cdn.jsdelivr.net/npm/react@16.13.1/umd/react.production.min.js",
"react-dom": "https://cdn.jsdelivr.net/npm/react-dom@16.13.1/umd/react-dom.production.min.js",
We can add the application import statement as well by getting them in the same way as we didfor Angular and Vue applications.


micro-root/index.ejs
Now I will go to the micro frontend-layout.html and create a new route called page-two and add‘header’ with ‘page two’ by the following code.
<routepath="page-two">
<applicationname="micro-header"></application>
<application name="@micro-page-two/micro-page-two"></application>
</route>

micro-root/microfrontend-layout.html
The new path is added to the application and you can go to http://localhost:9000/page-two to see the second page.

Finally, we haveAngular, Vue, and react projects inside the same application which areindependent of each other. You can use this concept in any kind of micro frontend application development.

Conclusion
It is easy to stay witha monolith front end for a simple project but when you are building a highcomplex frontend application in a distributed manner you can choose to go with micro frontends. It has a massive amount of benefits for such an application as mentioned above.
Thanks for reading! 😊
.png)