
Building a chat application step by step
Building a real timechat application is the starting point for developing many applications withsocket connections, which involve two way communication between server andclient. This chat application can be converted to other apps such asmultiplayer quiz games, state changing applications and more. In this post, itwill be explained how to develop a chat application using NodeJS back-end andAngular front-end. Furthermore, we will be using socket.io for socket communication. Therefore, to continue, youneed to have Angular and NodeJS pre-installed.
Creating the Node application
Our first task is tocreate the Node project. For that, an empty directory called socket-backendwill be created and terminal/ command prompt will be started from it. Then type“npm init” and press enter and keep default settings by pressing enter to keepit simple.

Now you will seepackage.json file created inside the folder. Then we will install expressframework by typing
npm install express@4.15.2
in terminal. After thatlet’s create the following folder structure for our application.
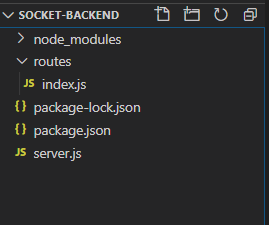
This contains a folder ‘routes’with ‘index.js’ file inside it and a file called server.js in the maindirectory which will be the starting point for the Node application. Next stepis to setup server.js file to serve our application. For that, the following codeis typed inside it.
view rawserver.js hosted with❤ by GitHub
Now we can run theapplication by typing the following command in terminal.
node server.js
This will listen to port 3000. If you go to localhost:3000 onyour browser you should able to see the text “hello”. If so, you now have aworking node express application.
Now, a few more thingsfor the application to run even more easily. First, I will install nodemonusing the following command.
npm install nodemon
This package willmonitor the application and run it again automatically when we make changes andsave. There is no need to run the application manually after each change. Then the following command will be added in package.json under “scripts”.
"scripts": {
"serve" : "nodemon server.js"
},
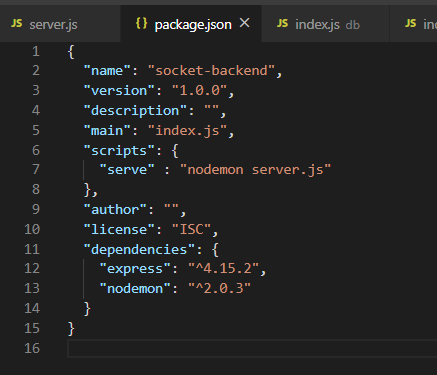
Now we can run the application by “npm run serve”.
Integrating with socket.io
We can install socket.ioby simply running,
npm install socket.io
Then we must importsocket.io to server.js file by adding
var io =require('socket.io')(http);
and then the following lines will be added to listen to the connection event for new incoming socketconnections and log into the console.
io.on('connection',(socket) => {
console.log('auser connected');
});
The completed server.jsfile looks like this.
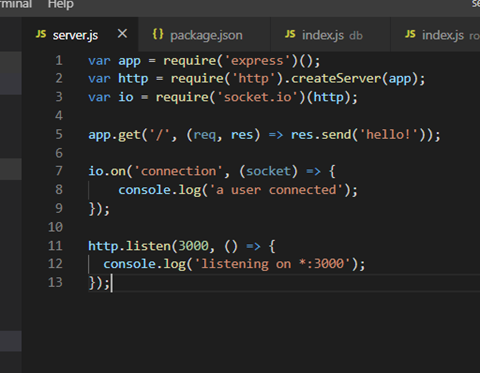
server.js / Server application
Let’s keep this asidefor a moment and create the angular client to start the connection.
Creating Angular application
Let’s create a newangular project called socket-frontend. For that, I will go back to the maindirectory in terminal and type,
ng new socket-frontend
After creating the newproject, let’s open it from the code editor. We can run the angular applicationby typing,
ng serve
in the terminal. (Note:if you encounter an error about rxjs while running the above command, updatethe package.json file “rxjs”: “⁶.0.0” with “rxjs”: “6.0.0” andrun npm install).
ng serve will run theangular application in default port 4200. If you go to localhost:4200 from thebrowser you will see the angular application running.
Now let’s create a newcomponent by
ng g c chat-inbox
and use that componentby updating app.component.html file to
<div>
<app-chat-inbox></app-chat-inbox>
</div>
Now you will only see“chat-inbox works!” in the browser. Next step is to install the socket-clientpackage in angular application. So let’s install that with,
npm installsocket.io-client
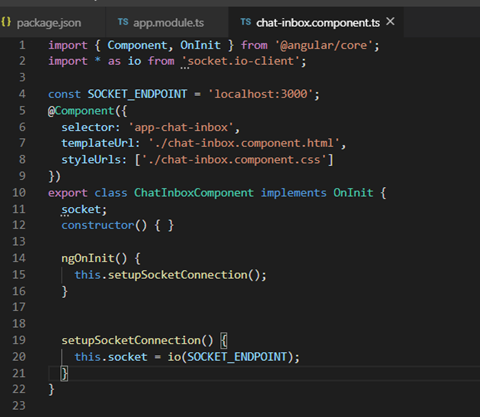
Now we can start usingsocket.io-client package. Although it is better to use a separate service fileto handle socket connections, I will handle the socket connection in thechat-inbox.component.ts file to make it more simple.
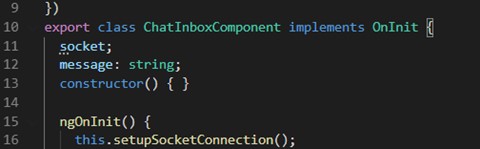
First I will create aconstant for socket endpoint in chat-inbox.component.ts
const SOCKET_ENDPOINT =‘localhost:3000’;
Then I will create avariable called “socket” to hold the socket created. Use the function called“setupSocketConnection” to initiate the socket connection and include it insidengOnInit as below.
view rawchat-inbox.component.ts hosted with ❤ by GitHub
The completed chat-inbox.component.tsfile looks like this.
Now you can go to the(running) angular application using any browser while the node application isrunning. Then you will see the text, “user connected” in the node application terminal.
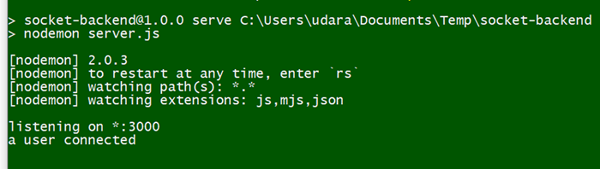
If you got this, cheers!You have successfully connected the angular socket client to node socketserver.
Our next task is tocreate a methods to receive messages from a client and send them to otherclients in real-time. For that I will go to node application server.js file andupdate following code as shown below.
view rawserver.js hosted with❤ by GitHub
This will watch the“message” event to get a message from the client side and then emit that message to “message-broadcast” event from sever-side.
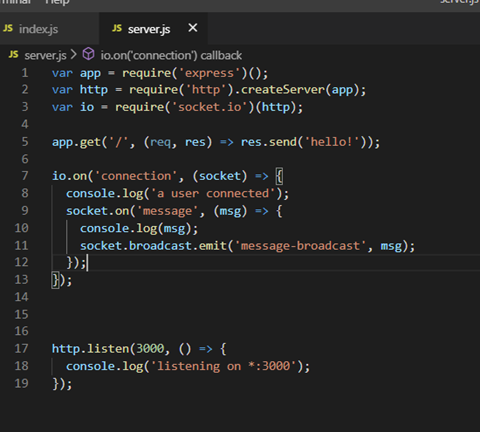
server.js
Now let’s go to theAngular application and make some changes to send and receive messages.
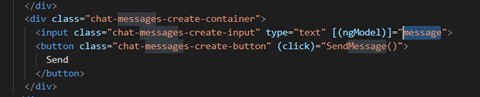
I will go to the chat-inbox.component.html file and add some containers to show the messages andmessage submission area to type and send a message. Further I will go tochat-inbox.component.css file and add some styles to make it nice. (I have added some styles, only for demonstration purposes).
view rawchat-inbox.component.html hosted with ❤ by GitHub
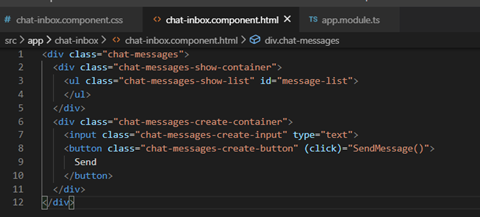
chat-inbox.component.html
view rawchat-inbox.component.css hosted with ❤ by GitHub
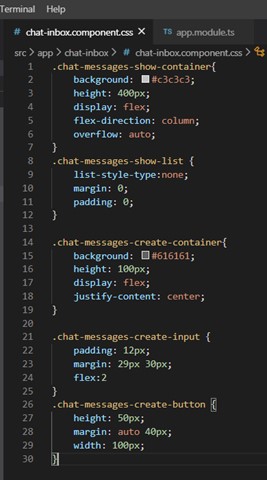
chat-inbox.component.css
To use Angular forms Iwill go to app.module.ts and import the FormsModule using
import { FormsModule }from ‘@angular/forms’;
and use it inside theimports array.
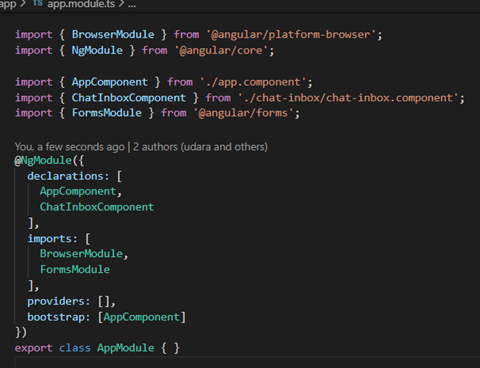
app.module.ts
Now we can use ngModelto bind the input to a variable in chat-inbox. Therefore, a variable called ‘message’is created in chat-inbox.components.ts and it is bound to input-box inchat-inbox.components.html.
chat-inbox.component.ts
chat-inbox.component.html
Now we can go tochat-inbox.components.ts and update the send message function.
view rawchat-inbox.components.ts hosted with ❤ by GitHub
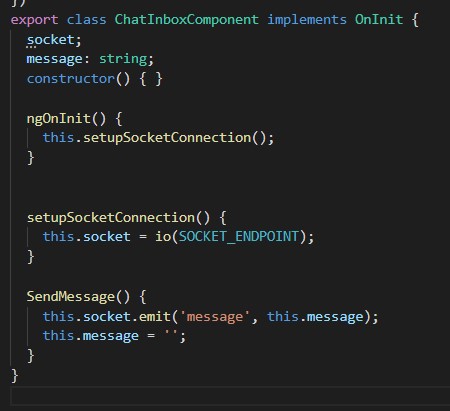
chat-inbox.component.ts
Now if you type something in the input box and press ‘send’ button you should be able to seethe message from node application console. What is remaining is to make it sothat the other users also will receive the message.
For that I will makesome modifications in setupSocketConnection function.
view rawchat-inbox.component.ts hosted with ❤ by GitHub
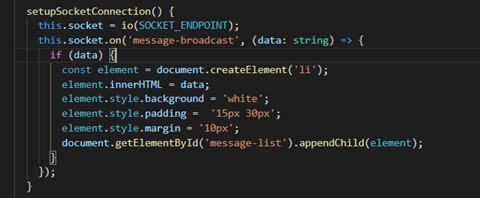
chat-inbox.component.ts
This will fetch themessages from socket and append it to “message-list” element.
In the chat-inbox weshould show sent messages as well. For that we will modify send messagefunction as follows.
view rawchat-inbox.component.ts hosted with ❤ by GitHub
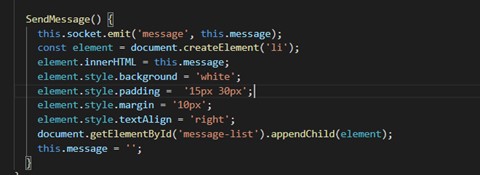
chat-inbox.component.ts
Now you can open thechat application in two separate browser tabs and test it by sending a test message.
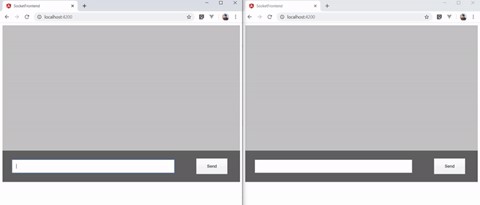
Finally we havecompleted creating a chat application with socket.io. This can send messages inreal-time to any number of users. You can customise this application with yourown styles and concepts.
Next Steps
After building this youmay come across some problems. For e.g. messages disappear when users refreshthe page; this supports only one chat room; separate chat rooms cannot becreated nor individual messages can be sent to a group of people.
As a solution we can usea database to store the messages and retrieve the previous messages from itwhen the user refreshes the page. Furthermore, socket.io supports chat roomfacility and you can improve this app to create chat rooms and send messages tospecific chat room.
(Hope to bring them in afuture article.)
.png)