Authorisation is acrucial requirement for any web application. There are multiple mechanisms used for this purpose having their own pros and cons. Also there are severalopensource and paid libraries and frameworks that implement them. JWT tokenbased authentication and authorisation is a relatively new and popular implementation used by a lot of modern applications.
1. What is JWT?
https://jwt.io says, JSON Web Token (JWT) is an open standard (RFC 7519) that defines a compact and self-contained method for securely transmitting information between parties as a JSON object. This information is verified and trusted because it is digitally signed. JWTs can be signed using asecret (with the HMAC algorithm) or a public/private key pair using RSAor ECDSA.
2. How it works?
· Initially the client authenticates with the server using a method such as via a usernameand a password.
· When the authentication is successful, server will generate a JWT token. This token isencrypted, having information such as Username, Role- authorisation information) about the logged-in user.
· This token will be sent back to client as the response.
· In thesubsequent requests, client send the JWT token. A common place to send it is the Authorisation header using Bearer schema.
· Server will decode the token and authorise the user using the sent data.
3. What will we build?
Here we’ll develop asimple Spring Boot application with users having different roles. Depending onthose roles, users will be allowed to access different APIs.
4. Create a Spring Boot application
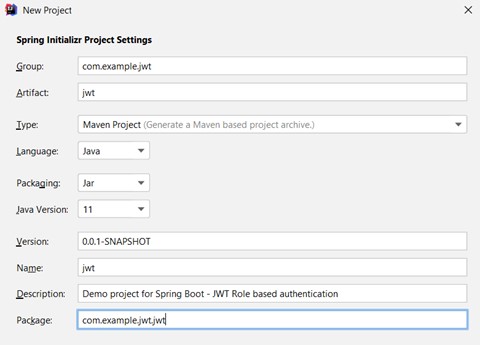
Using your favorite IDE (IntelliJ IDEA used here) create a new application with Spring Initialiser.
Basic POM
view raw Spring Boot-JWTTokens.java hosted with ❤ by GitHub
5. Entities and DAO
We will create a Userentity and a Role entity, and corresponding repositories for database access.Also create an enum to represent available roles.
view rawSpringBoot-JWTTokens.java hosted with ❤ by GitHub
view rawSpringBoot-JWTTokens.java hosted with ❤ by GitHub
Next let’slook into the security related classes having JWT specific changes.
6. JwtUtils
Let’s create this component for JWT related utilities like generating the token, getting username and validating it. When generating the token, we get the username using user details. Also we get help from io.jsonwebtoken library.
view rawSpringBoot-JWTTokens.java hosted with ❤ by GitHub
7. Authentication TokenFilter
In this filter class extending OncePerRequestFilter abstract class, we will implemen tthe doFilterInternal method in order to filter all the incoming requests. We get the JWT token from the Authorisation header and validate it.Then we get the user details from UserDetailsService and populate authentication in security context.
view rawSpringBoot-JWTTokens.java hosted with ❤ by GitHub
8. User details
JwtUserDetailsService willretrieve the user from users table and build a UserDetailsImplobject which implements User Details class. It will contain user information like id, username, email, password and authorities.
view rawSpringBoot-JWTTokens.java hosted with ❤ by GitHub
view rawSpringBoot-JWTTokens.java hosted with ❤ by GitHub
In User DetailsImplwe are populating details of the user. Check the build method that get the name of each role and map to an authority. Check this article to get a clear idea about role and authority.
9. Register/ login —AuthenticationController
During"register", user’s details should be collected and persisted in the userstable. Also their roles should be mapped.
Further to that, during each login process, a JWT token should be generated (with the help of JwtUtils) and passed to the client in order to send in subsequent requests.
view rawSpringBoot-JWTTokens.java hosted with ❤ by GitHub
10. TestController
Let’s introduce a new controller to simulate the API access by clients. Users having different roleswill call different URLs to execute several operations. As discussed in step 7,Authentication TokenFilter will filter and permit only the requests containing valid JWT tokens.
In Test Controller we will allow calling a certain URL only if the user has the corresponding role privilege. We use spring security provided @PreAuthorize annotation for this purpose. Public APIs will not contain this annotation and will allow any authenticated user in.
view rawSpringBoot-JWTTokens.java hosted with ❤ by GitHub
11. Running the application
In order to keep thisblog post concise and clear, I have provided only the important code snippers above. But you can check the full code here and fill the missing parts in the project you implemented now. Also you can directly checkout and run the full code if you prefer.
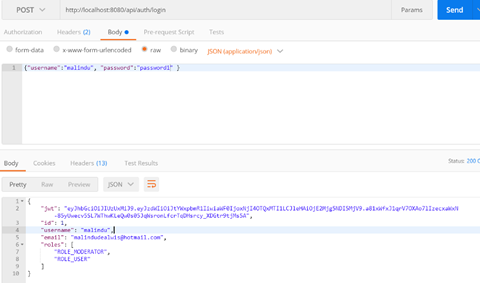
Let’s use postman to send requests. Create a request containing username and password and call the login API. In the response you will get the JWT token, roles and other user information.
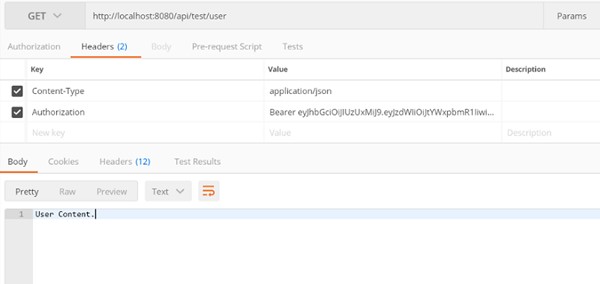
Then let’s call the /user API which permits our user in, because the allowed roles with @PreAuthorize annotation matches roles entitled to the user. Don’t forget to put the received JWT token in the Authorisation header. We get the dummy response as expected.
Then we’ll try to access the /admin path which should not be allowed to our user. We getthe Forbidden (403) response.
12. Conclusion
.png)